If you’re a cat owner, you know just how essential a good cat scratcher is. It’s not only a tool for your feline friend to stretch and groom their claws—it’s also a crucial part of protecting your furniture. Over time, even the best scratchers wear out. That favorite sisal-covered post or cardboard lounger eventually frays, shreds, and stops serving its purpose. Instead of tossing the whole scratcher in the trash, why not give it a new lease on life?
In this post, we’ll walk you through everything you need to know about replacing worn-out materials on a cat scratcher. Whether it's a sisal rope post, a cardboard scratcher pad, or a carpet-covered base, we’ve got step-by-step tips to help you restore it efficiently and safely.
Why Replace Instead of Buy New?
Before we get into the how, let’s talk about the why. Replacing worn-out scratcher materials instead of buying new ones offers several advantages:
- Cost-effective: Buying replacement materials is usually far cheaper than a new scratcher.
- Eco-friendly: Reducing waste helps the environment—reuse the structure, replace only what’s necessary.
- Cat satisfaction: Cats are creatures of habit. They often prefer familiar items, even if they’re a little beat-up.
- Customizable: You can tailor your scratcher with more durable or aesthetic materials when you do it yourself.
Assessing the Damage
The first step is to take a good look at the scratcher. Identify the specific components that are worn out:
- Is the sisal rope shredded or unraveling?
- Is the cardboard insert ripped to shreds?
- Is the carpet covering torn or detached?
- Is the structure itself (wood or plastic frame) still stable?
If the base structure is solid, replacing the surface material is completely worth your time. If the frame is unstable or broken, you may be better off buying or building a new one.
Tools and Materials You’ll Need
Depending on the type of scratcher you have, you may need the following tools:
Tools:
- Utility knife or box cutter
- Staple gun or hot glue gun
- Scissors
- Screwdriver (if disassembly is needed)
- Measuring tape
Materials:
- Sisal rope or fabric (usually 1/4" to 3/8" thick)
- Corrugated cardboard (for scratcher pads)
- Carpet remnant (tightly woven is best)
- Heavy-duty staples or non-toxic adhesive
- Optional: Velcro strips for removable replacements
Make sure any replacement materials are pet-safe, non-toxic, and durable.
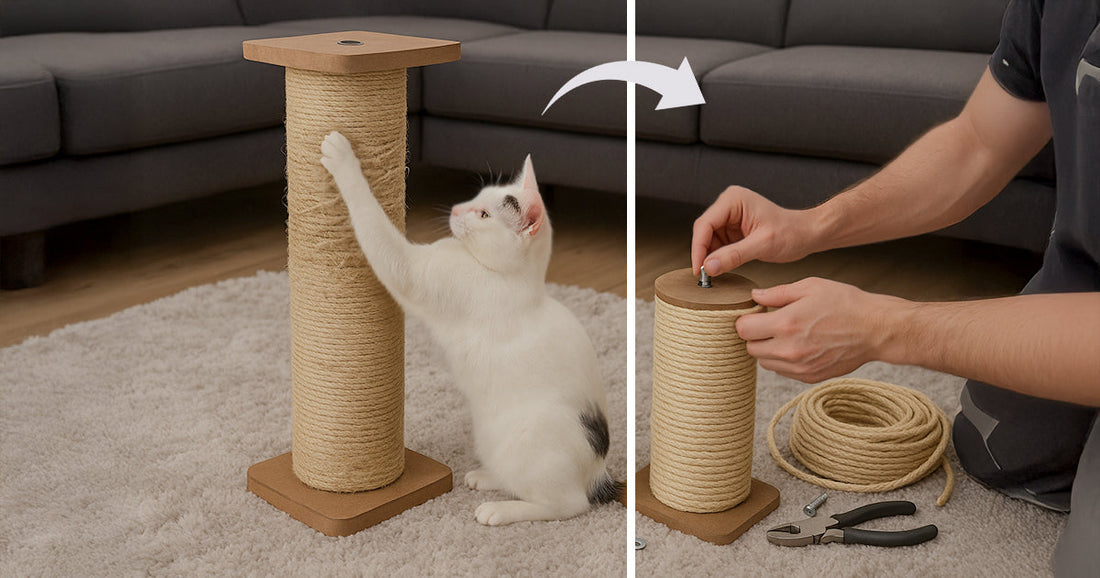
How to Replace Sisal Rope on a Cat Scratcher Post
Sisal rope is one of the most common materials for vertical scratching posts. Over time, it can fray and come loose. Here's how to replace it:
Step 1: Remove the Old Rope
- Start by cutting off the old rope with a utility knife or scissors.
- Remove any staples, nails, or glue that held it in place.
Step 2: Clean the Post
- Wipe off any debris or leftover glue.
- Sand down any rough edges or splinters if it's a wooden post.
Step 3: Attach New Sisal Rope
- Starting at the base, apply a line of hot glue or staple the end of the rope to secure it.
- Wrap the rope tightly around the post, keeping it flush with no gaps.
- Add glue or a staple every few inches for extra durability.
- When you reach the top, secure the end with glue or a staple.
Tip: For extra hold, pre-soak the sisal in water and let it dry tightly wrapped—this helps it contract and hold firmer.
How to Replace Cardboard on a Flat Scratcher
Cardboard scratchers are very popular, but they tend to wear out quickly. Instead of replacing the whole unit, just refresh the pad.
Step 1: Measure and Cut
- Measure the old cardboard pad to determine the size.
- Cut a new piece of corrugated cardboard to fit. You can buy pre-cut pads or use clean cardboard boxes.
Step 2: Insert or Attach
- If the scratcher has a removable slot, slide the new piece in.
- If not, you can use double-sided tape or Velcro strips to secure the cardboard to the base.
Tip: Stack several layers of cardboard glued together to create a thicker pad that lasts longer.
How to Replace Carpet on a Scratcher
Some scratchers are covered in carpet instead of rope or cardboard. When this becomes torn or matted, it can be replaced with a new piece.
Step 1: Remove the Old Carpet
- Cut or pull away the old carpet with a utility knife.
- Remove any remaining staples or nails.
Step 2: Cut the New Carpet
- Use the old carpet as a template to cut the new one.
- Make sure the fibers are short and tightly looped to avoid snagging.
Step 3: Attach the Carpet
- Use a heavy-duty staple gun or a strong adhesive to secure the new carpet in place.
- Smooth out wrinkles and ensure all edges are firmly attached.
Maintenance Tips to Extend the Life of Your Scratcher
Now that you’ve replaced the worn-out parts, here are a few tips to help it last longer:
- Rotate scratchers: Give one a break while using another to spread wear evenly.
- Trim claws: Regular claw trimming reduces damage to scratchers.
- Use catnip: Sprinkle some on the refreshed area to renew your cat’s interest.
- Spot clean: Remove fur, dust, and dander weekly to maintain cleanliness.
When It’s Time to Say Goodbye
Sometimes, despite your best efforts, a scratcher is beyond saving. If the base is wobbly, damaged, or unsafe, replacement is the best option. But until then, upcycling and repairing is a fun DIY project that saves money and satisfies both you and your pet.
Final Thoughts
Replacing worn-out materials on a cat scratcher is a practical, eco-conscious way to keep your cat happy and your home intact. Whether it’s swapping out a frayed sisal rope, refreshing a torn carpet, or crafting a new cardboard pad, the process is simple and satisfying. Best of all, it gives your furry friend a familiar, functional place to sharpen their claws—without sacrificing your couch in the process.
So grab your tools and a roll of sisal—your cat will thank you with extra purrs and fewer shredded cushions.
Have you ever done a DIY cat scratcher upgrade? Share your tips and photos in the comments!